


Upgrade results from buyers after sanding down the magnet:

Advantages:
-

Zero warping
These beds are much flatter than the stock ones and the main difference is that they keep the same shape at any temperature. These beds have been tested for over half a year at temps from 50C to 130C.
That means: no heat soaking, no layer issues and first layer issues caused by bed warping.
-

130C Bed Temperature
These beds can be heated up to 130C, compared to 105 stock bed which warps like crazy over 100C. Heater has inbuilt 150C self-recovery switch for safety. You can use 115-120C bed temperature for better first layer adhesion and to reduce warping. Also, an add bed fans to help with chamber heating.


Useful information:
-

Graphite Flatness
Every single graphite plate is tested for flatness with precision tools. All graphite plates are in the 0.1mm flatness range.
-

Bed Flatness
The main advantage of this bed is zero warping. You don't need to waste time heat soaking the bed to avoid related print issues.
The bed mesh depends on many things: z assembly, bed plate, bed magnet,
gantry, probe, build plate etc. With all these factors you may have
from 0.1 up to 0.5mm flatness mesh. -

Flat mesh ≠ Perfect first layer
Super flat mesh doesn't mean you get perfect first layer. And the other way around, not perfectly flat mesh doesn't mean you can't have a perfect first layer. We have a printer with 0.07mm range mesh and the first layer is terrible, because of the twisted gantry. To fix your issues with first layer we suggest using Axis Twist Compensation on both X and Y


-

Tested with Cartographer Probe
Every single bed was tested and meshed with Cartographer probe after assembly, which is much more accurate than stock PRTouch. All meshes are 0.1-0.25mm flatness.
But, again, mesh depends on your probe and your gantry!
Some of our testers got 0.25-0.35mm meshes after installation, but the magnet can be sanded to get better results.
-

Magnet is the issue
The magnets that are used in 3D printer are imperfect. the thickness of the
magnet with the adhesive layer may vary withing 0.4mm range (+-0.2mm).
Fortunately, these magnets can be sanded. Use this kind of sponge blocks grit 60-80 to sand off any peaks on the mesh. With this trick our buyers could get their mesh from 0.44mm range down to 0.09mm. -

Mount it right
If you use the stock PRTouch bed probe then use the stock metal spacers to mount the bed. For other probes you may use springs with bed knobs which allow you to use the "Screw Tilt Adjust" for easy bed leveling.


Installation Instructions:
If you are using an aftermarket SSR, we recommend printing an SSR mount first
Download an SSR mount using this link.
Thank you KrzysztofGW for designing it!
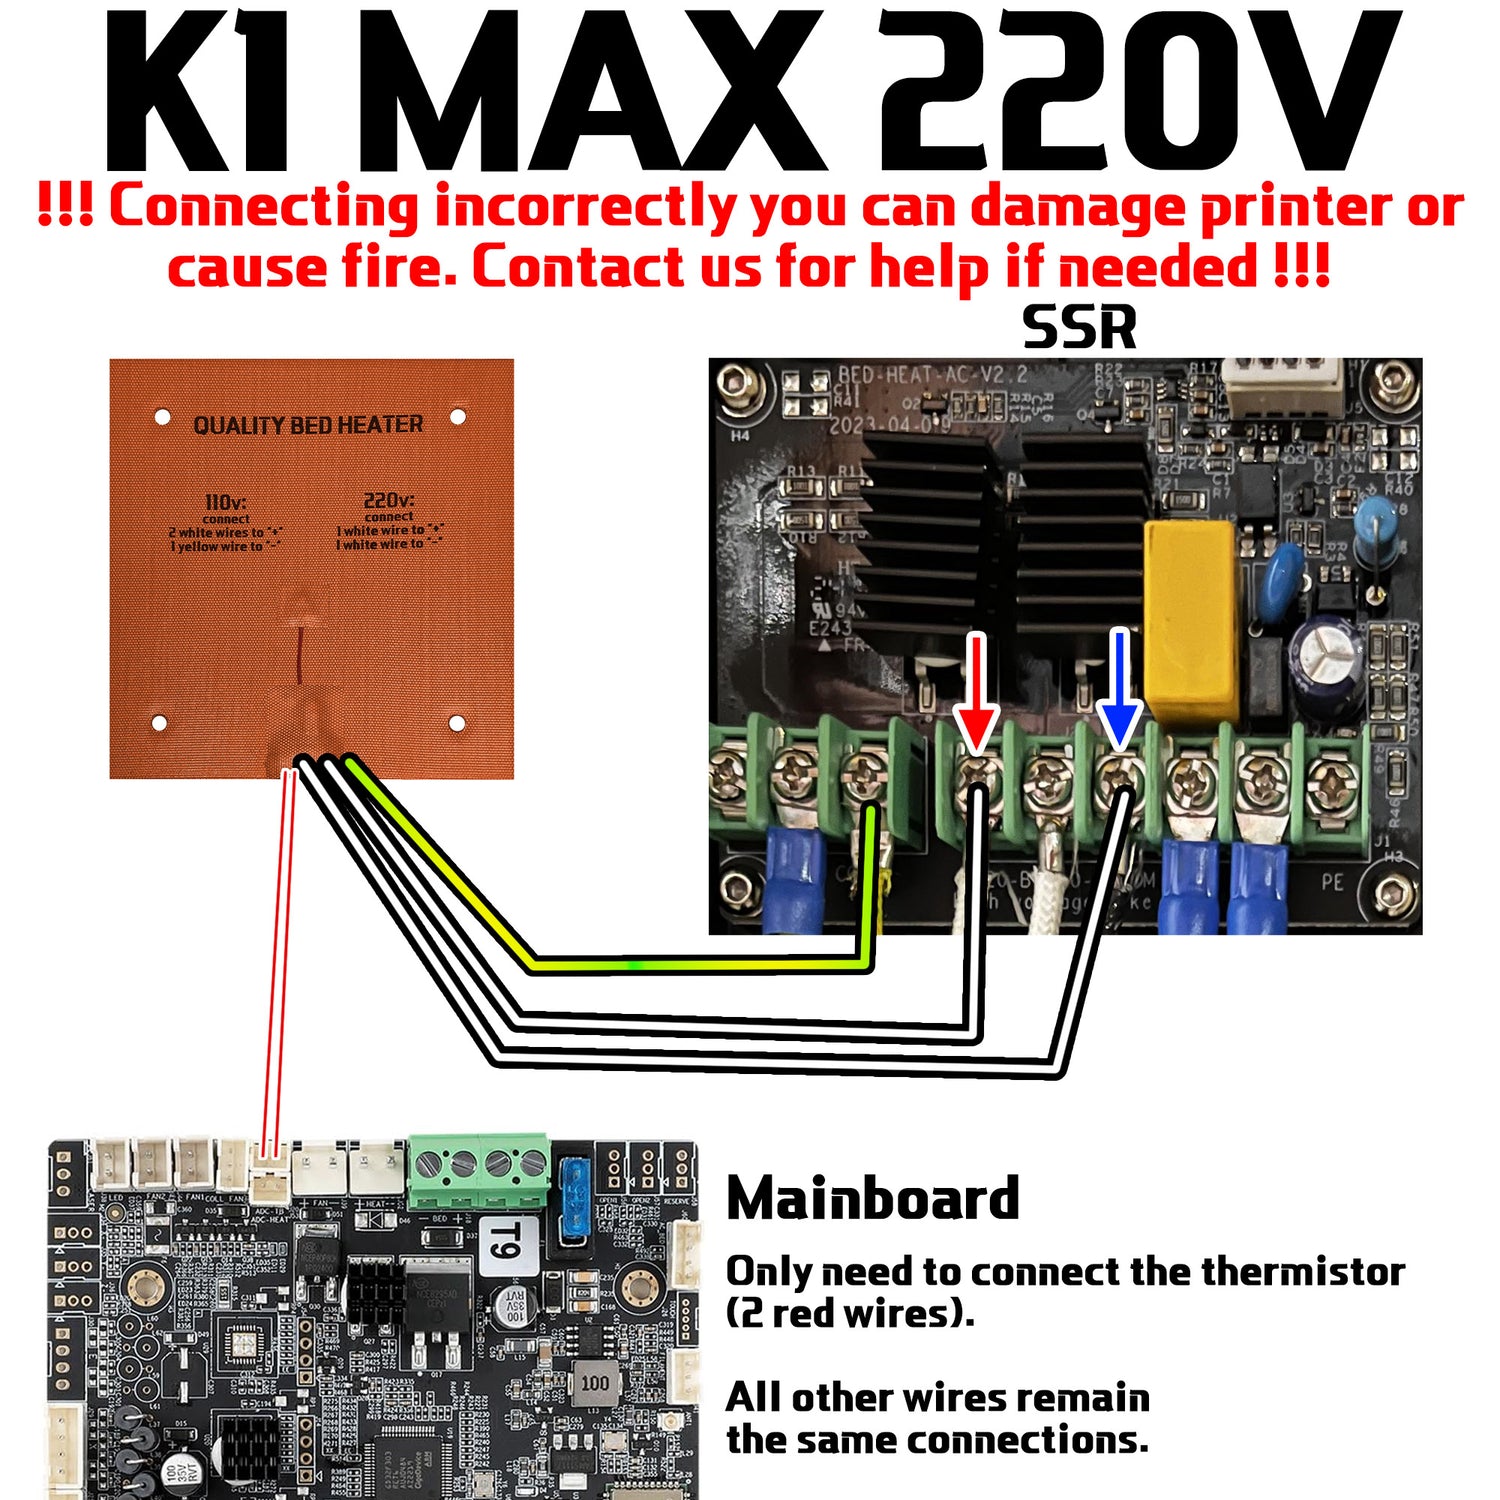
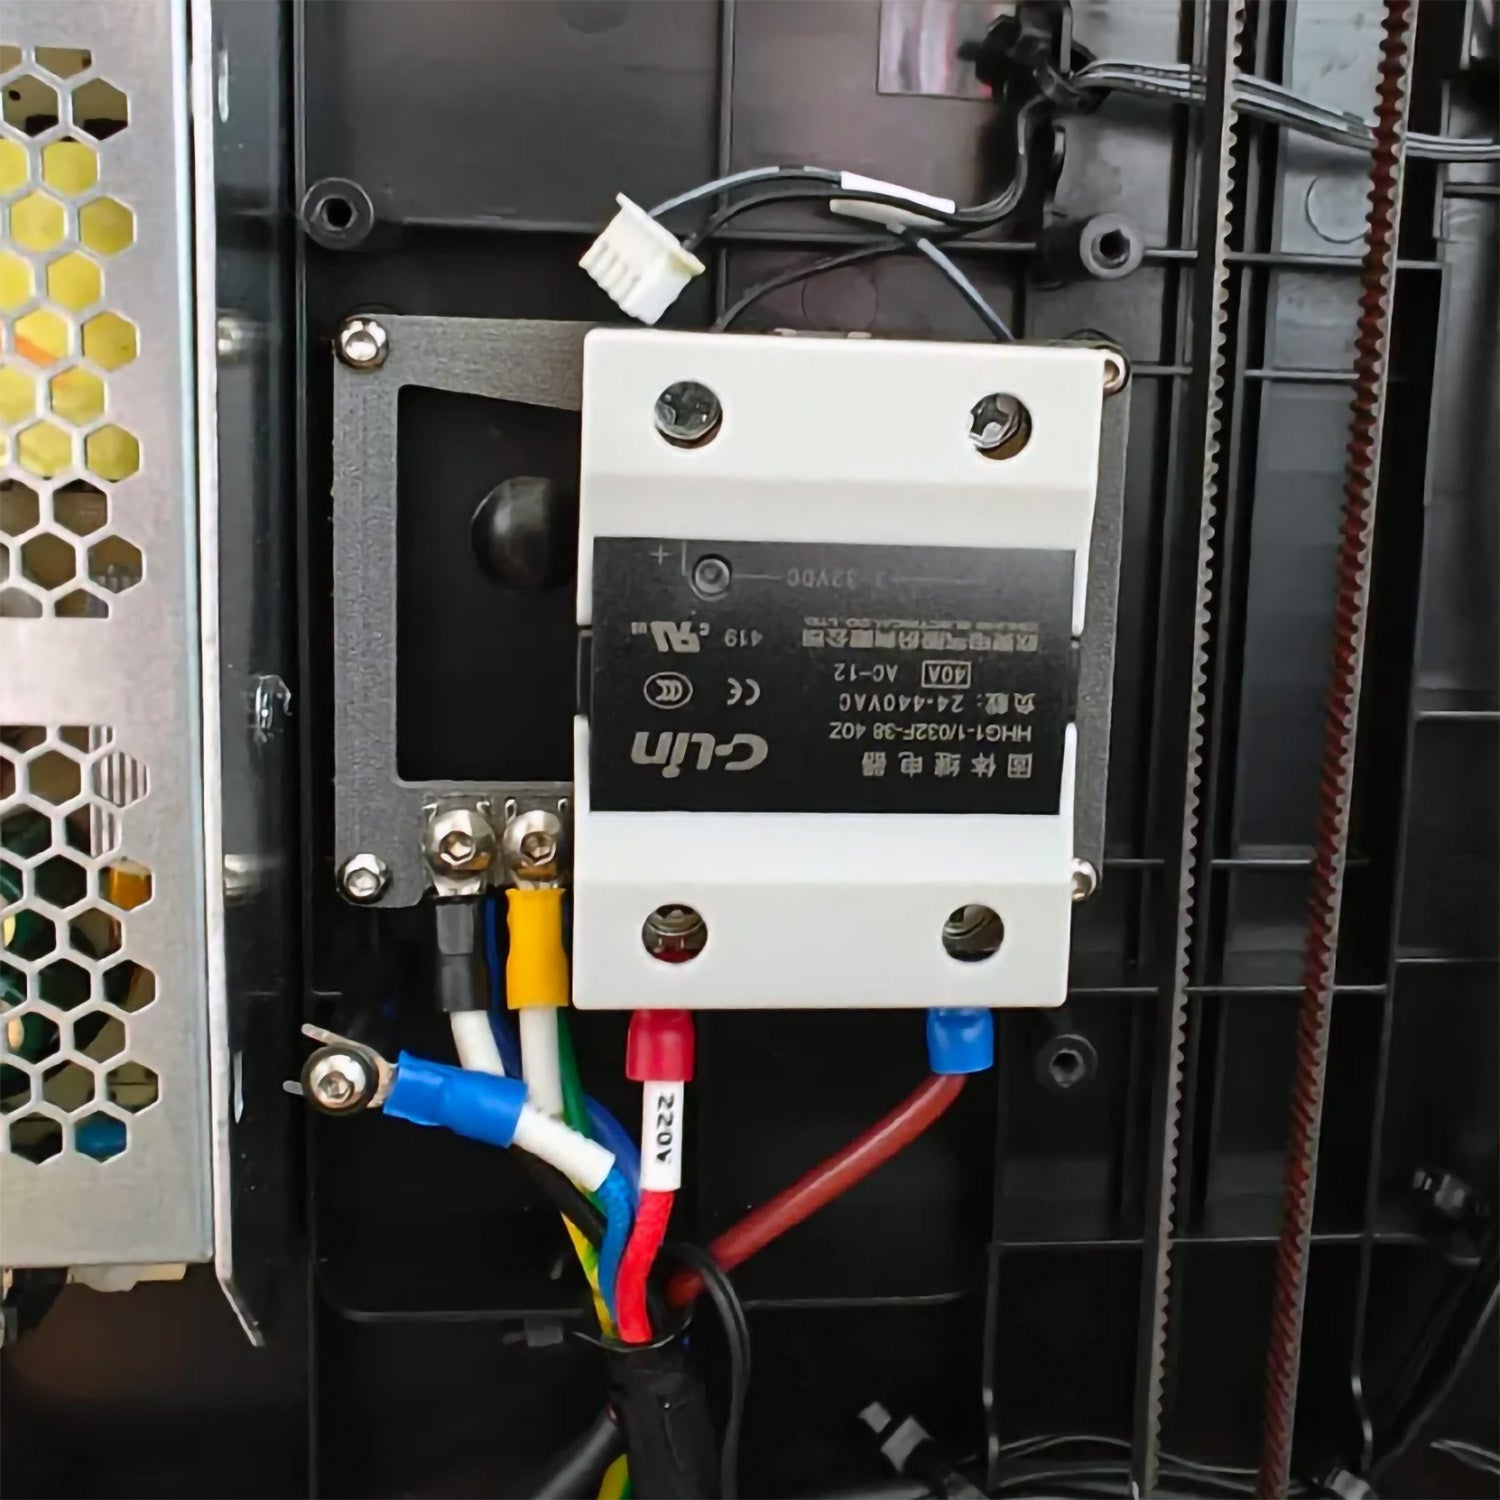
230V Connection (stock SSR):
1. Connect 2 white wires to COM and 220B slots on SSR. Connect the yellow and green grounding wire (grounding wire has a ring terminal).
2. Isolate with tape and DO NOT connect the 110v yellow wire.
3. Connect thermistor to the mainboard.
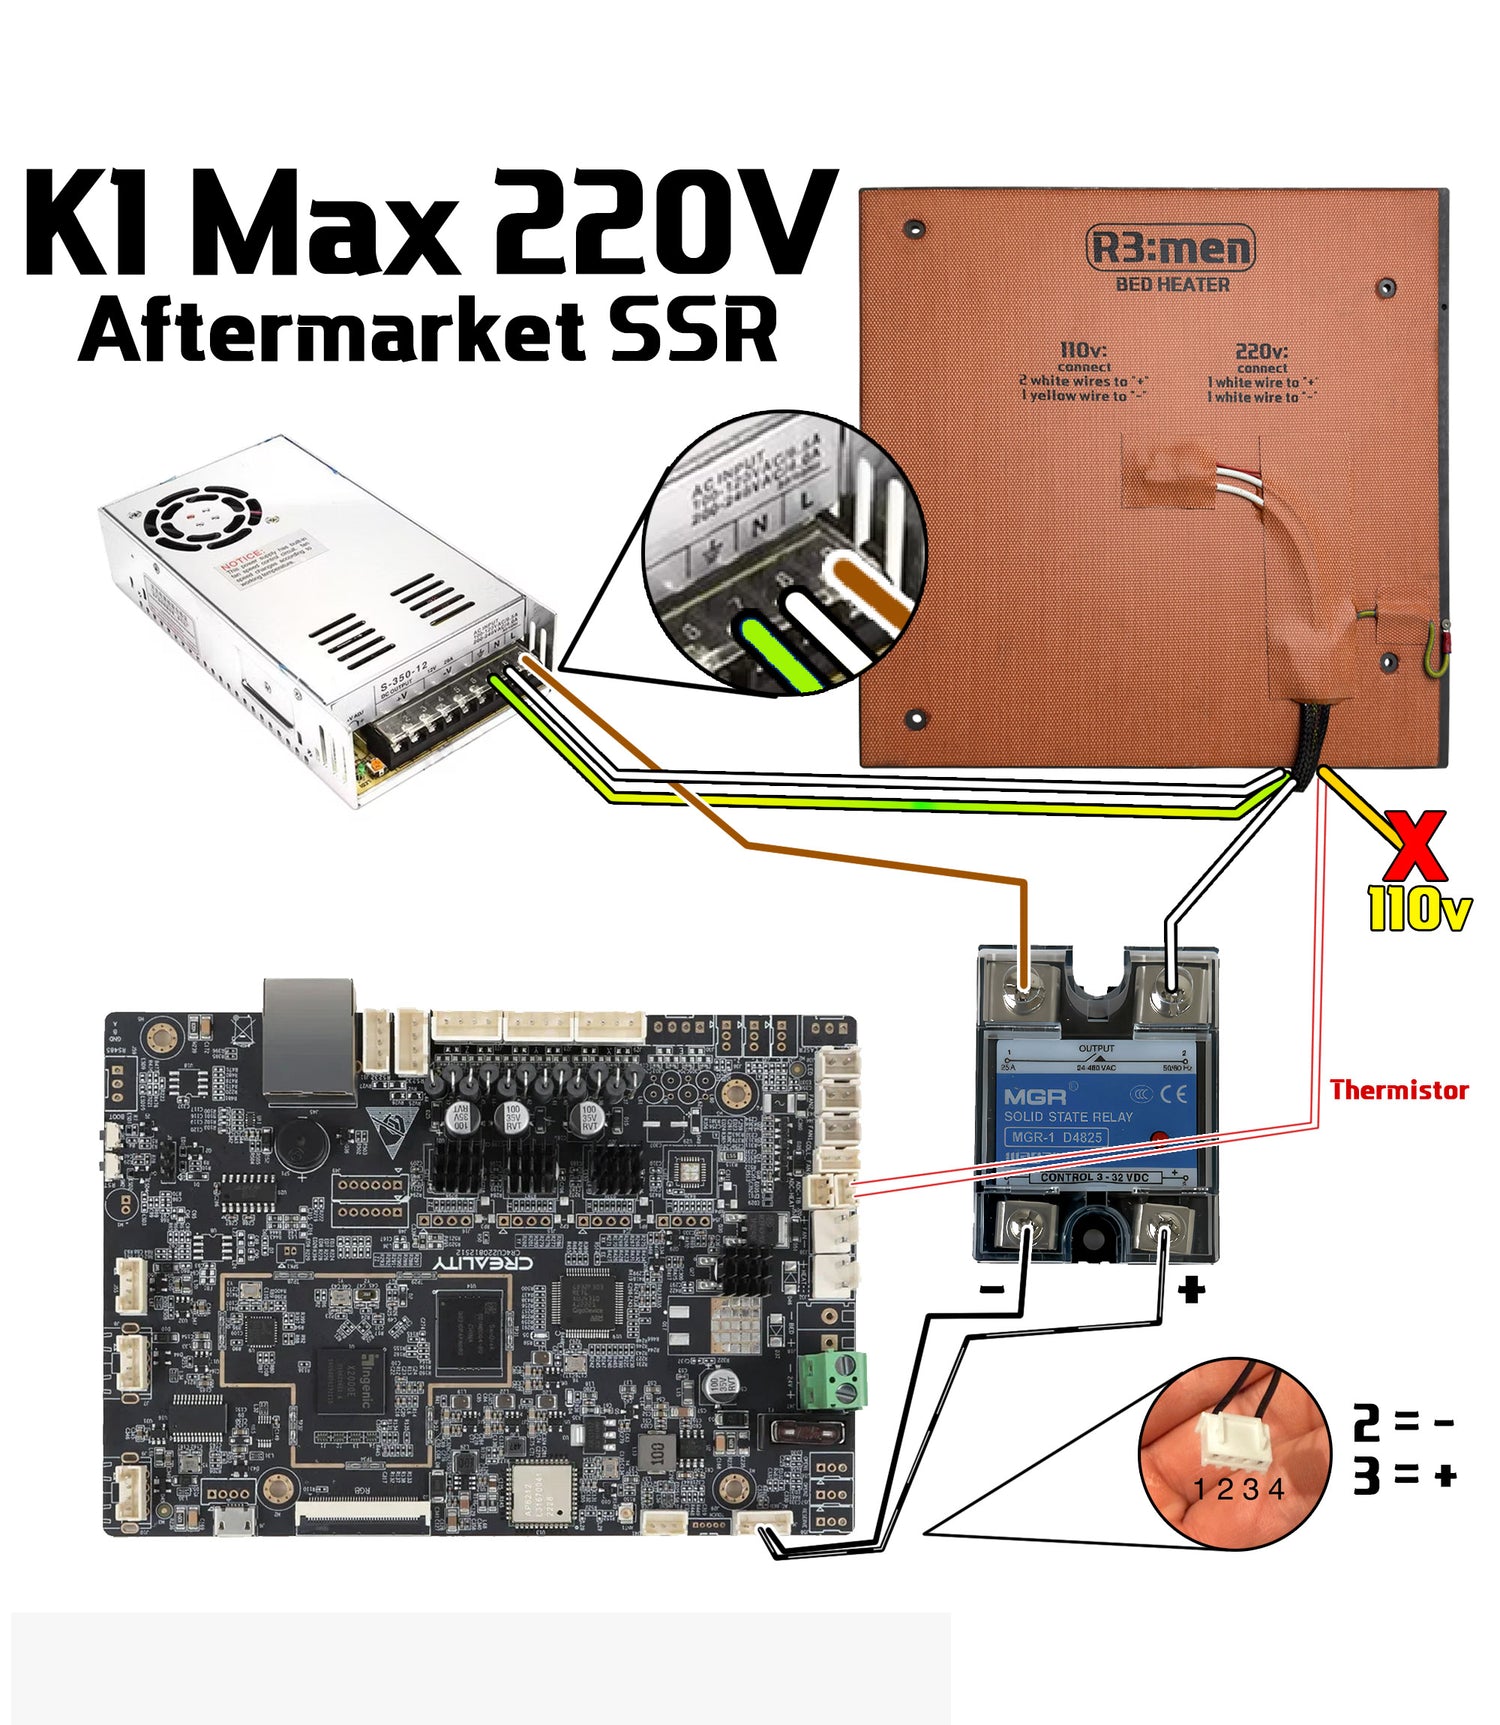
230V Connection (Aftermarket SSR):
1. Connect 1 white wire to OUTPUT 2 port on SSR. The other white wire to PSU N. Connect the yellow and green grounding wire to PSU grounding port. Connect the stock wire that comes from PSU L to OUTPUT 1 port on SSR.Isolate with tape and DO NOT connect the 110v yellow wire.
3. There is a 4-wire cable that connects the board with stock SSR. Connect 2 middle wires from this cable to the SSR control side. Normally the second wire is - and the third is +, but it can be the other way around.
4. Connect thermistor to the mainboard.

120V Connection (Stock SSR):
1. Connect 110v yellow wire (fork teminal) to COM slot, connect 2 white wires together to 110B slot on SSR. Connect the yellow and green grounding wire (grounding wire has a ring terminal).
2. Connect thermistor to the mainboard.

120V Connection (Aftermarket SSR):
1. Connect 2 white wires together to OUTPUT 2 port on SSR. Connect the 110v yellow wire to PSU N. Connect the yellow and green grounding wire to PSU grounding port. Connect the stock wire that comes from PSU L to OUTPUT 1 port on SSR.
2. There is a 4-wire cable that connects the board with stock SSR. Connect 2 middle wires from this cable to the SSR control side. Black with white lines is +, black is -.
3. Connect thermistor to the mainboard.
Rigid bed mounts
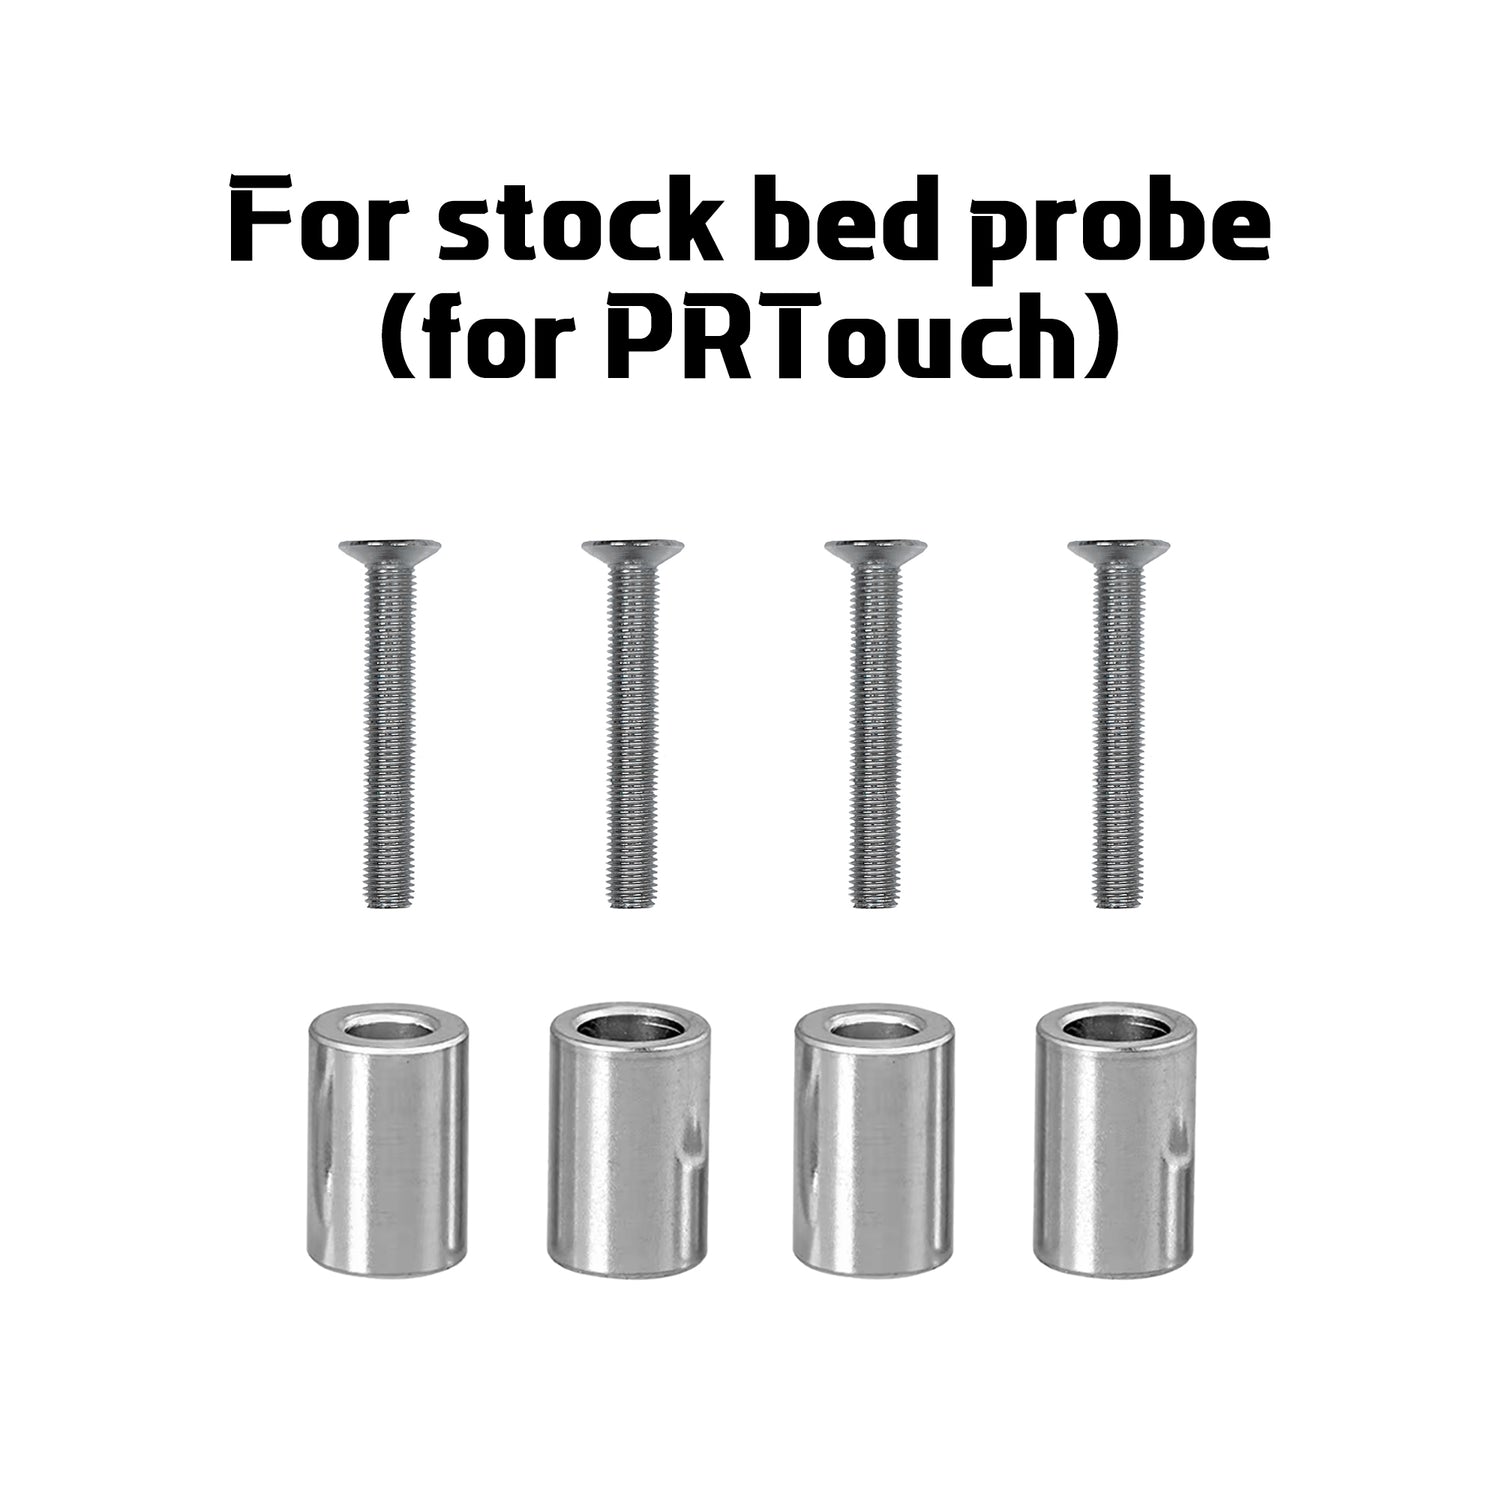
If you use stock bed probe (PRTouch) then use metal standoffs with M4 bolts.
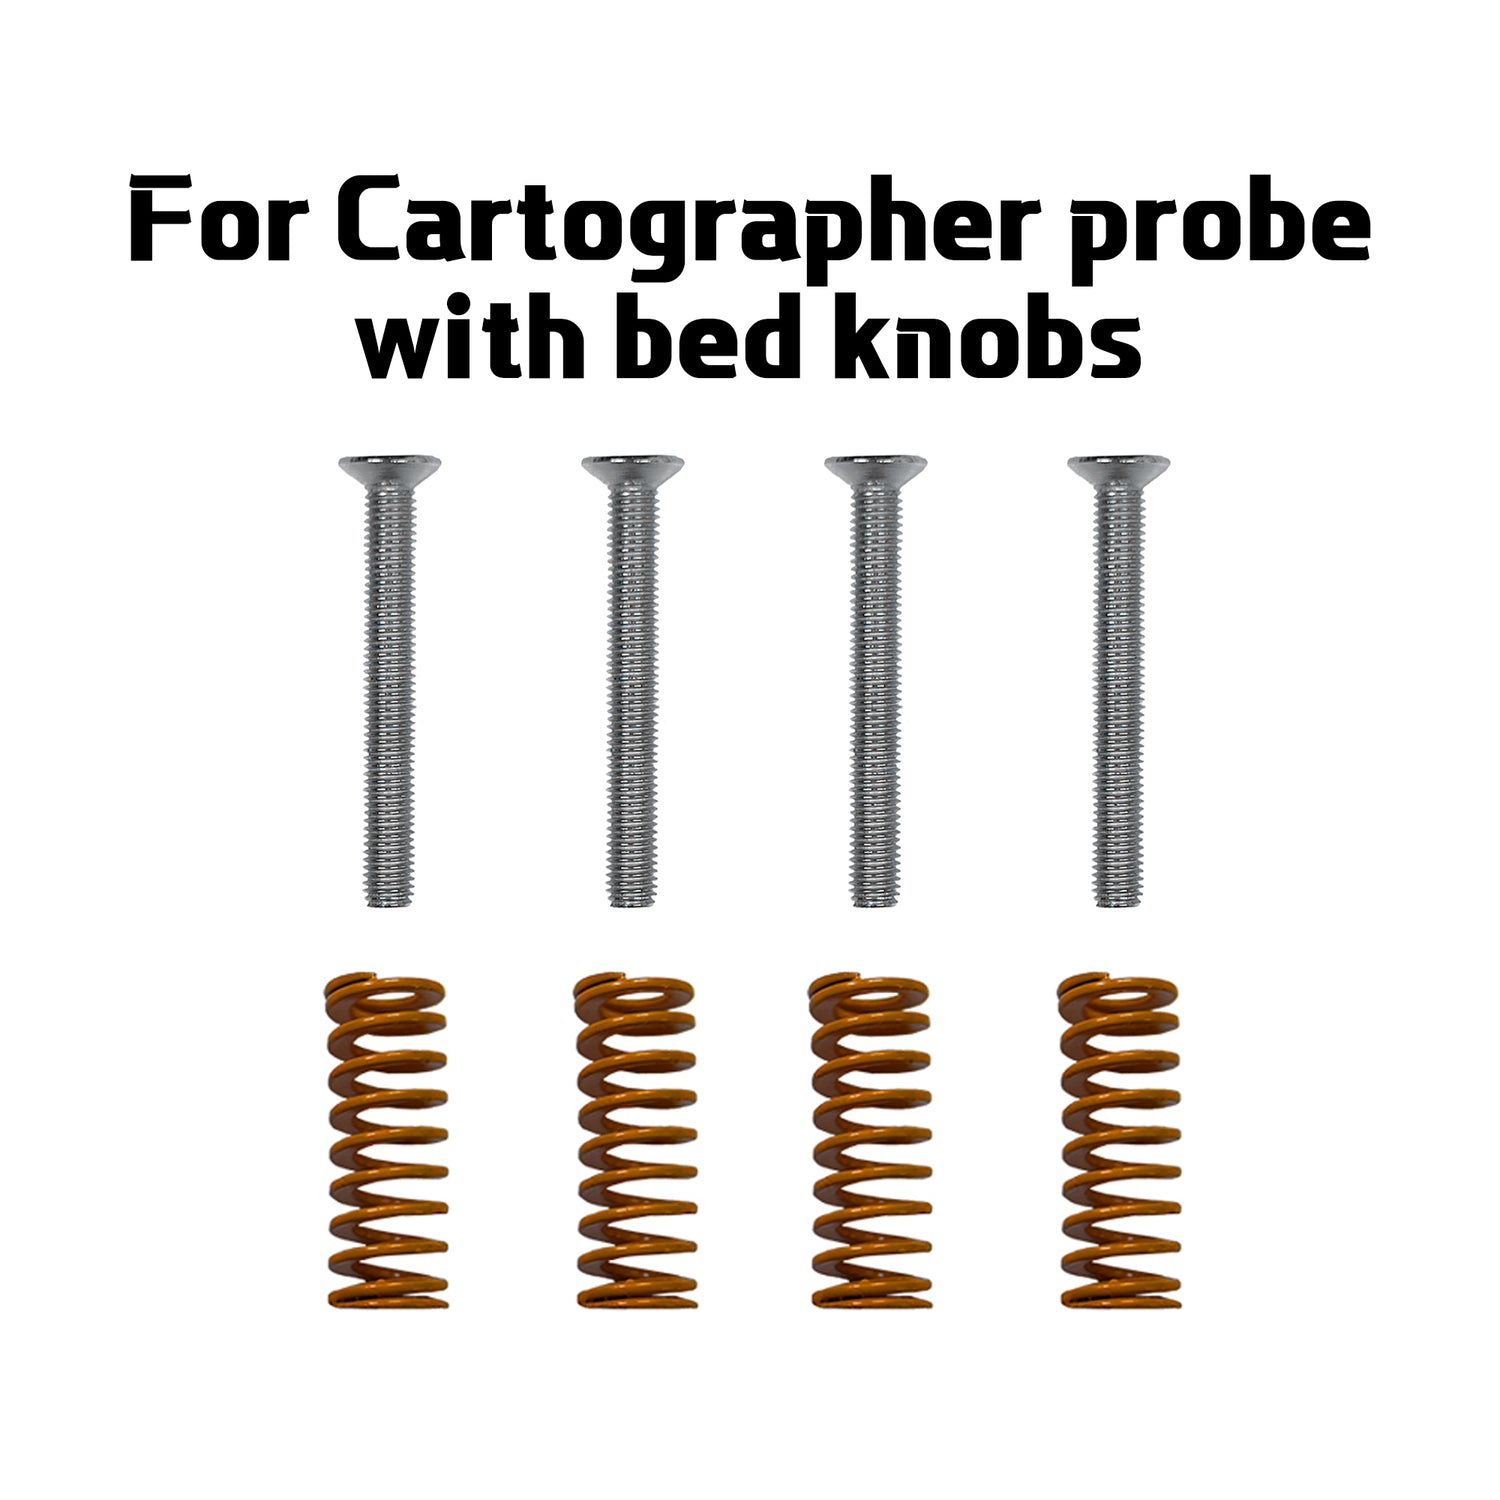
Springs and knobs
If you use cartographer or other Eddy sensor bed probes, then you may use springs with M4 bolts with bed knobs for easy bed leveling using screw tilt adjust. You may buy the bed knobs or print the knobs from Printables.
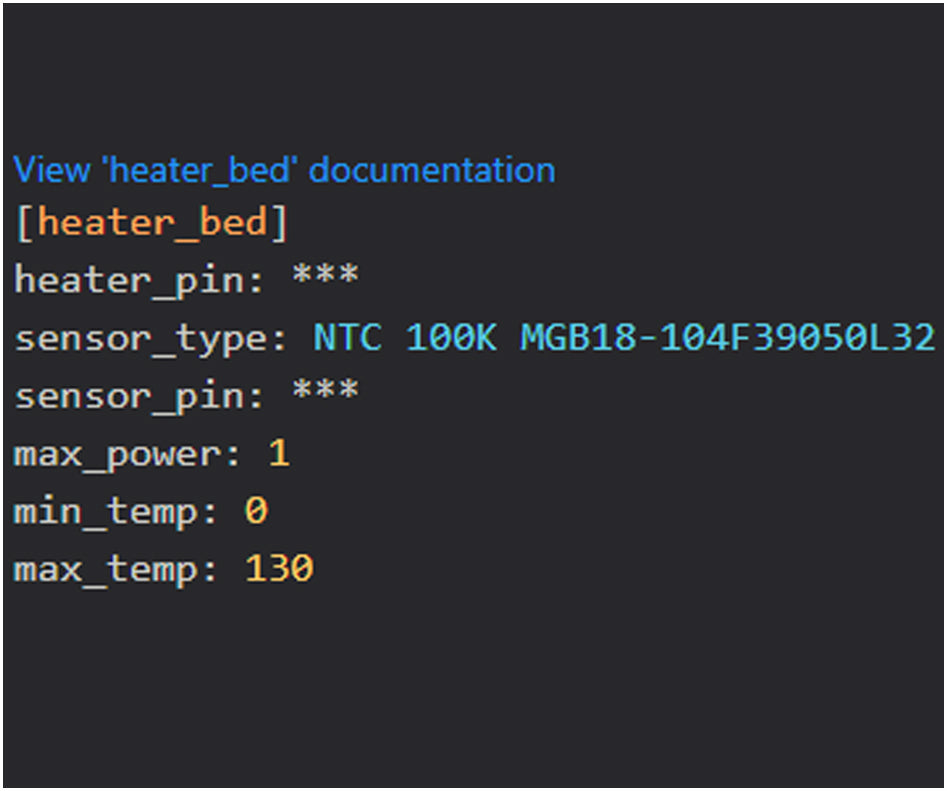
Thermistor type
You need to make changes in printer.cfg file. Find heater_bed section and change senosr type to "sensor_type: NTC 100K MGB18-104F39050L32".
On 120V, you may want to set max_power to 0.8 to reduce the load on your UPS and electrical switches.

Temperature Error
If you see negative temperature readings and printer throws temperature errors, that means that you did not change the thermistor type in the config file. See the previous step.
Also, some buyers had issues with the stock SSR. Our heater is more powerful than the stock heater (~1100W) and the stock SSR may not cope with it. If you see that bed heater power is 100% but the bed temperature is not changing, then you need to swap the stock SSR with an aftermarket one.
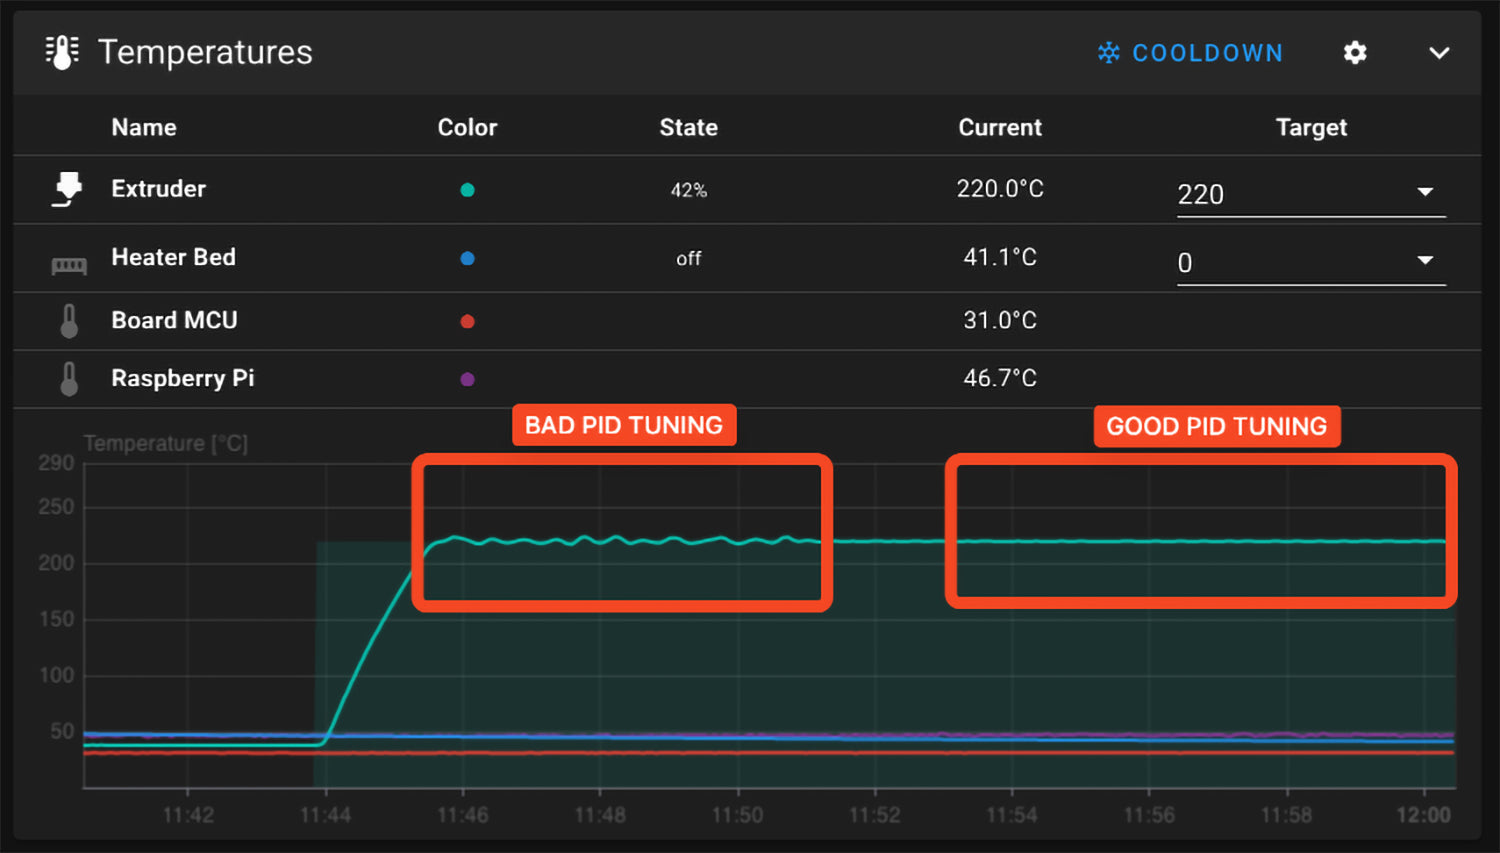
PID Calibration
The heater is more powerful than the stock heater. You need to run PID calibration in console by copy/pasting the command: “PID_CALIBRATE HEATER=heater_bed TARGET=70”. Then SAVE and restart
In this photo example it is the hotend temp graph. Bed temp graph can fluctuate in a bigger range than the hotend.
