


Upgrade results from buyers:

Advantages:
-

Zero warping
These beds are much flatter than the stock ones and the main difference is that they keep the same shape at any temperature. These beds have been tested for over half a year at temps from 50C to 130C.
That means: no heat soaking, no layer issues and first layer issues caused by bed warping.
-

Fast heating
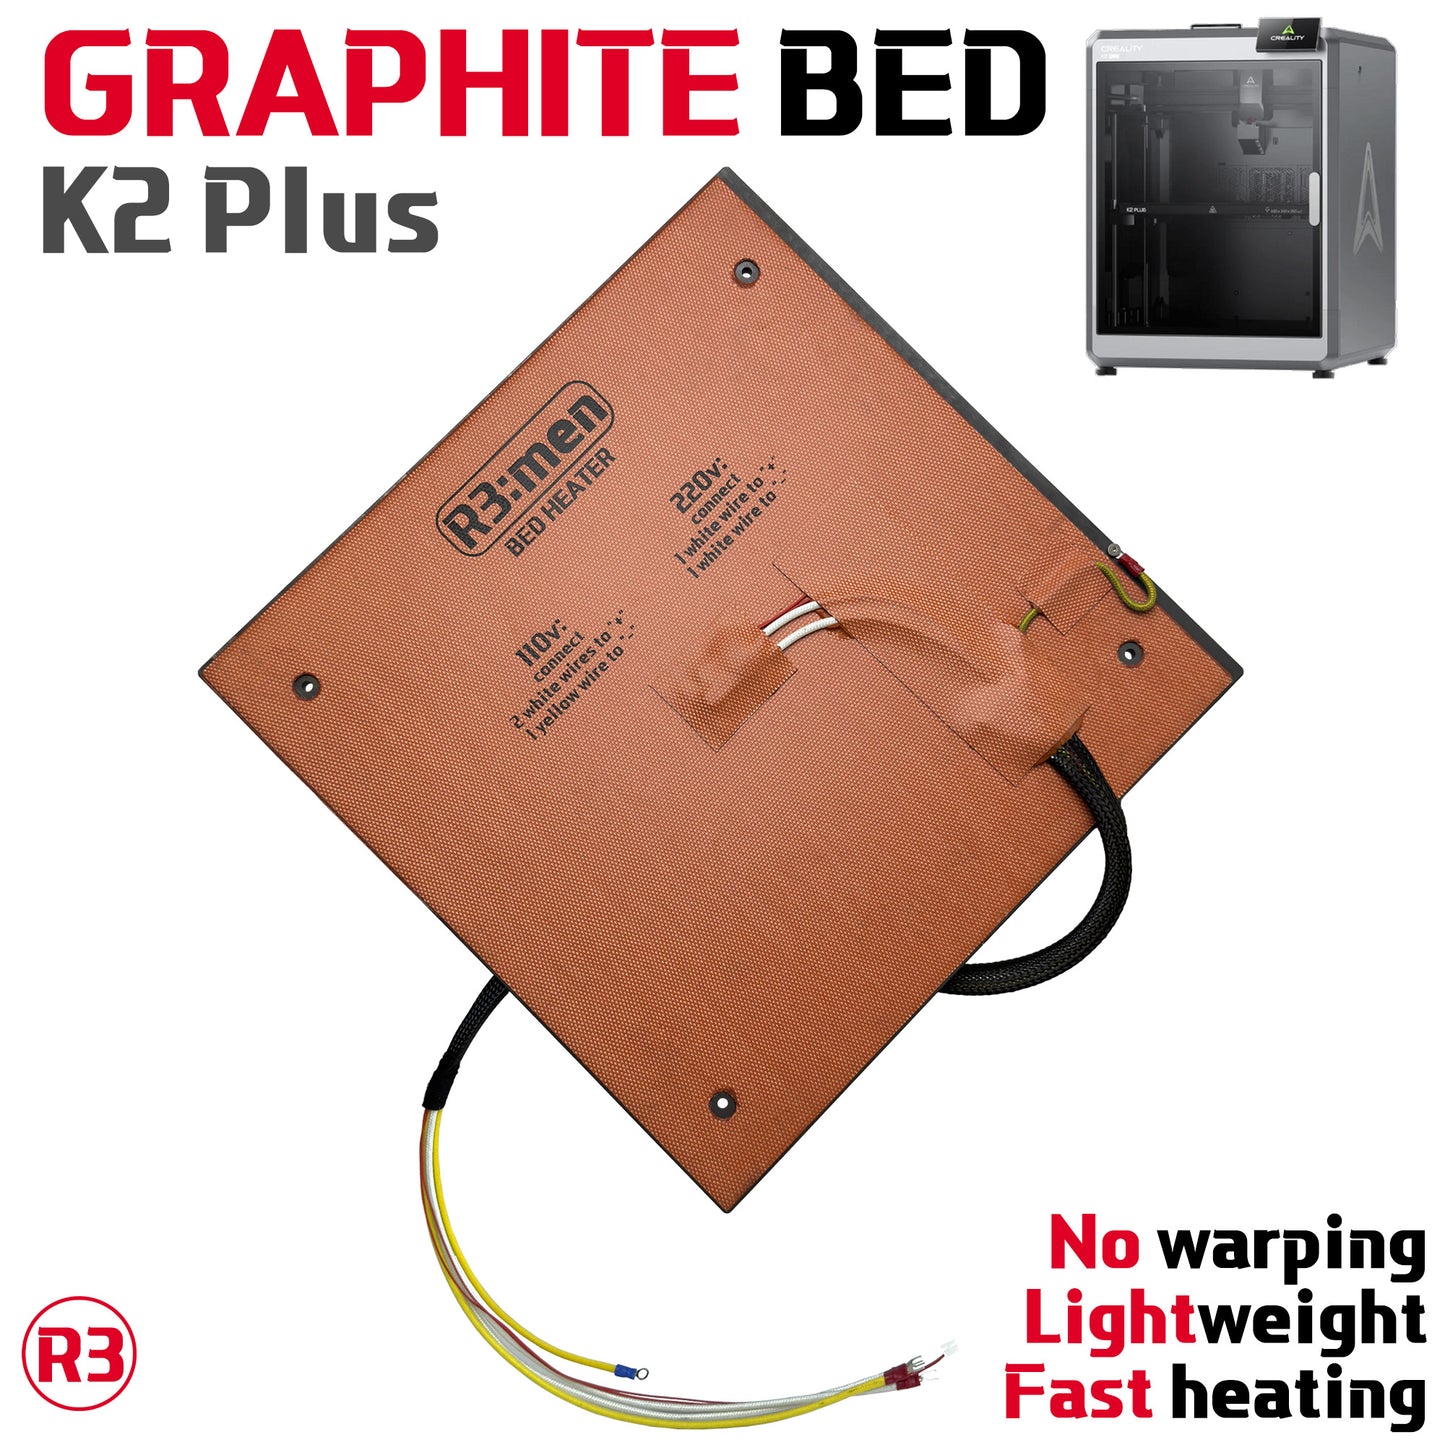
Graphite heats faster than aluminum and these beds come with 1000W heater vs stock 800W. So the heating time is 35-40% faster. And no need to heat soak, so you can start printing sooner than ever.
-

130C Bed Temperature
These beds can be heated up to 130C, compared to 105 stock bed which warps like crazy over 100C. Heater has inbuilt 150C self-recovery switch for safety. You can use 115-120C bed temperature for better first layer adhesion and to reduce warping. Also, an add bed fans to help with chamber heating.


Useful information:
-

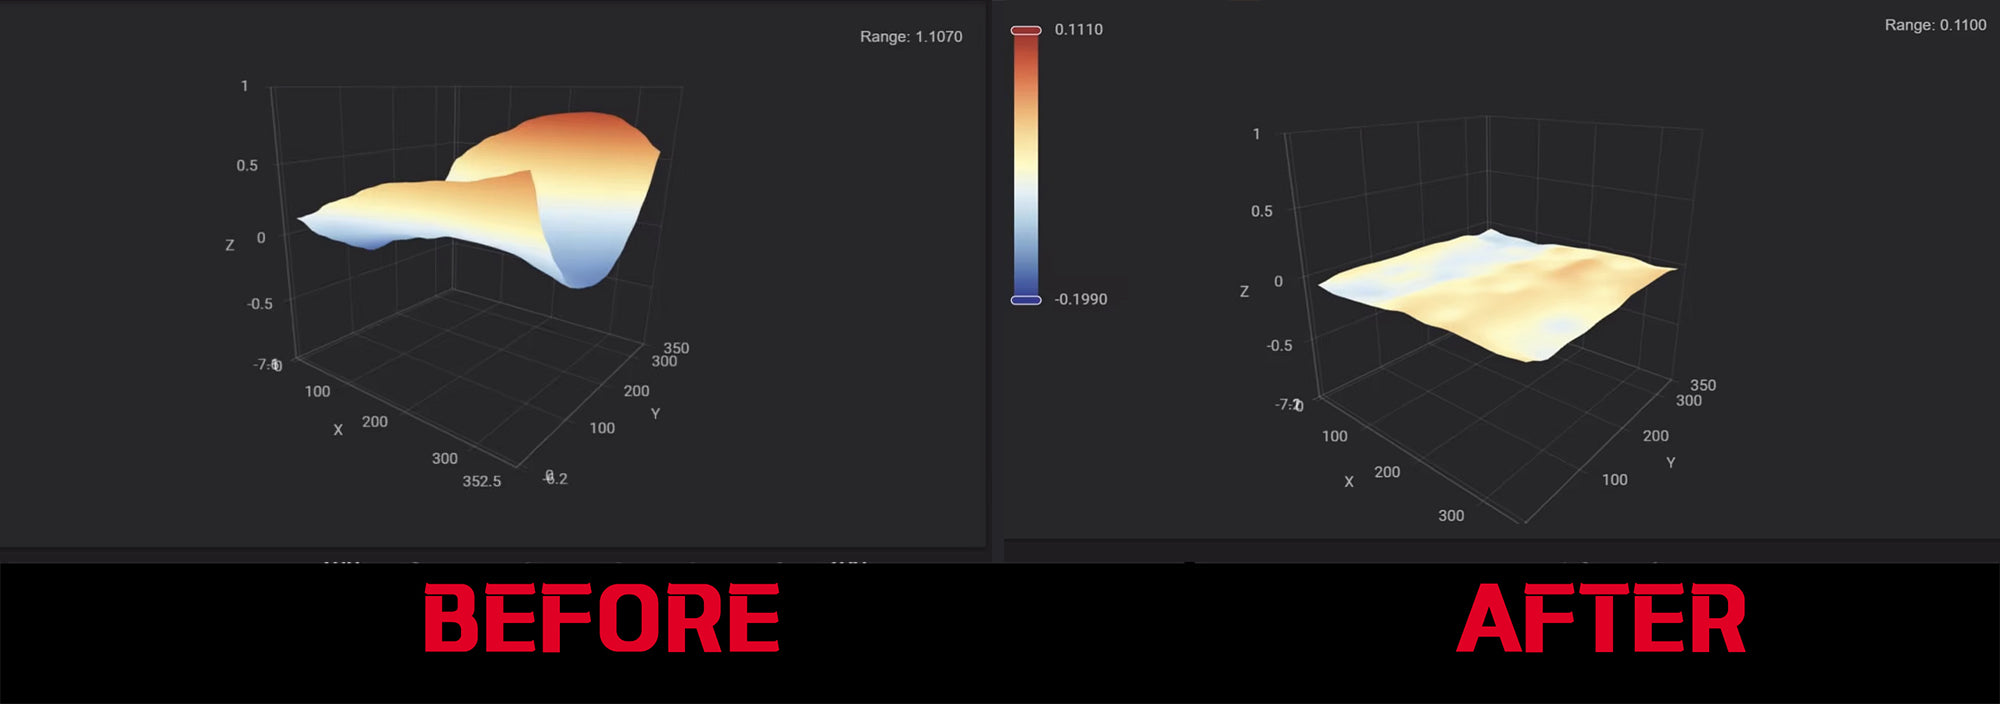
Graphite Flatness
Every single graphite plate is tested for flatness with precision tools. All graphite plates are in the 0.1mm flatness range.
-

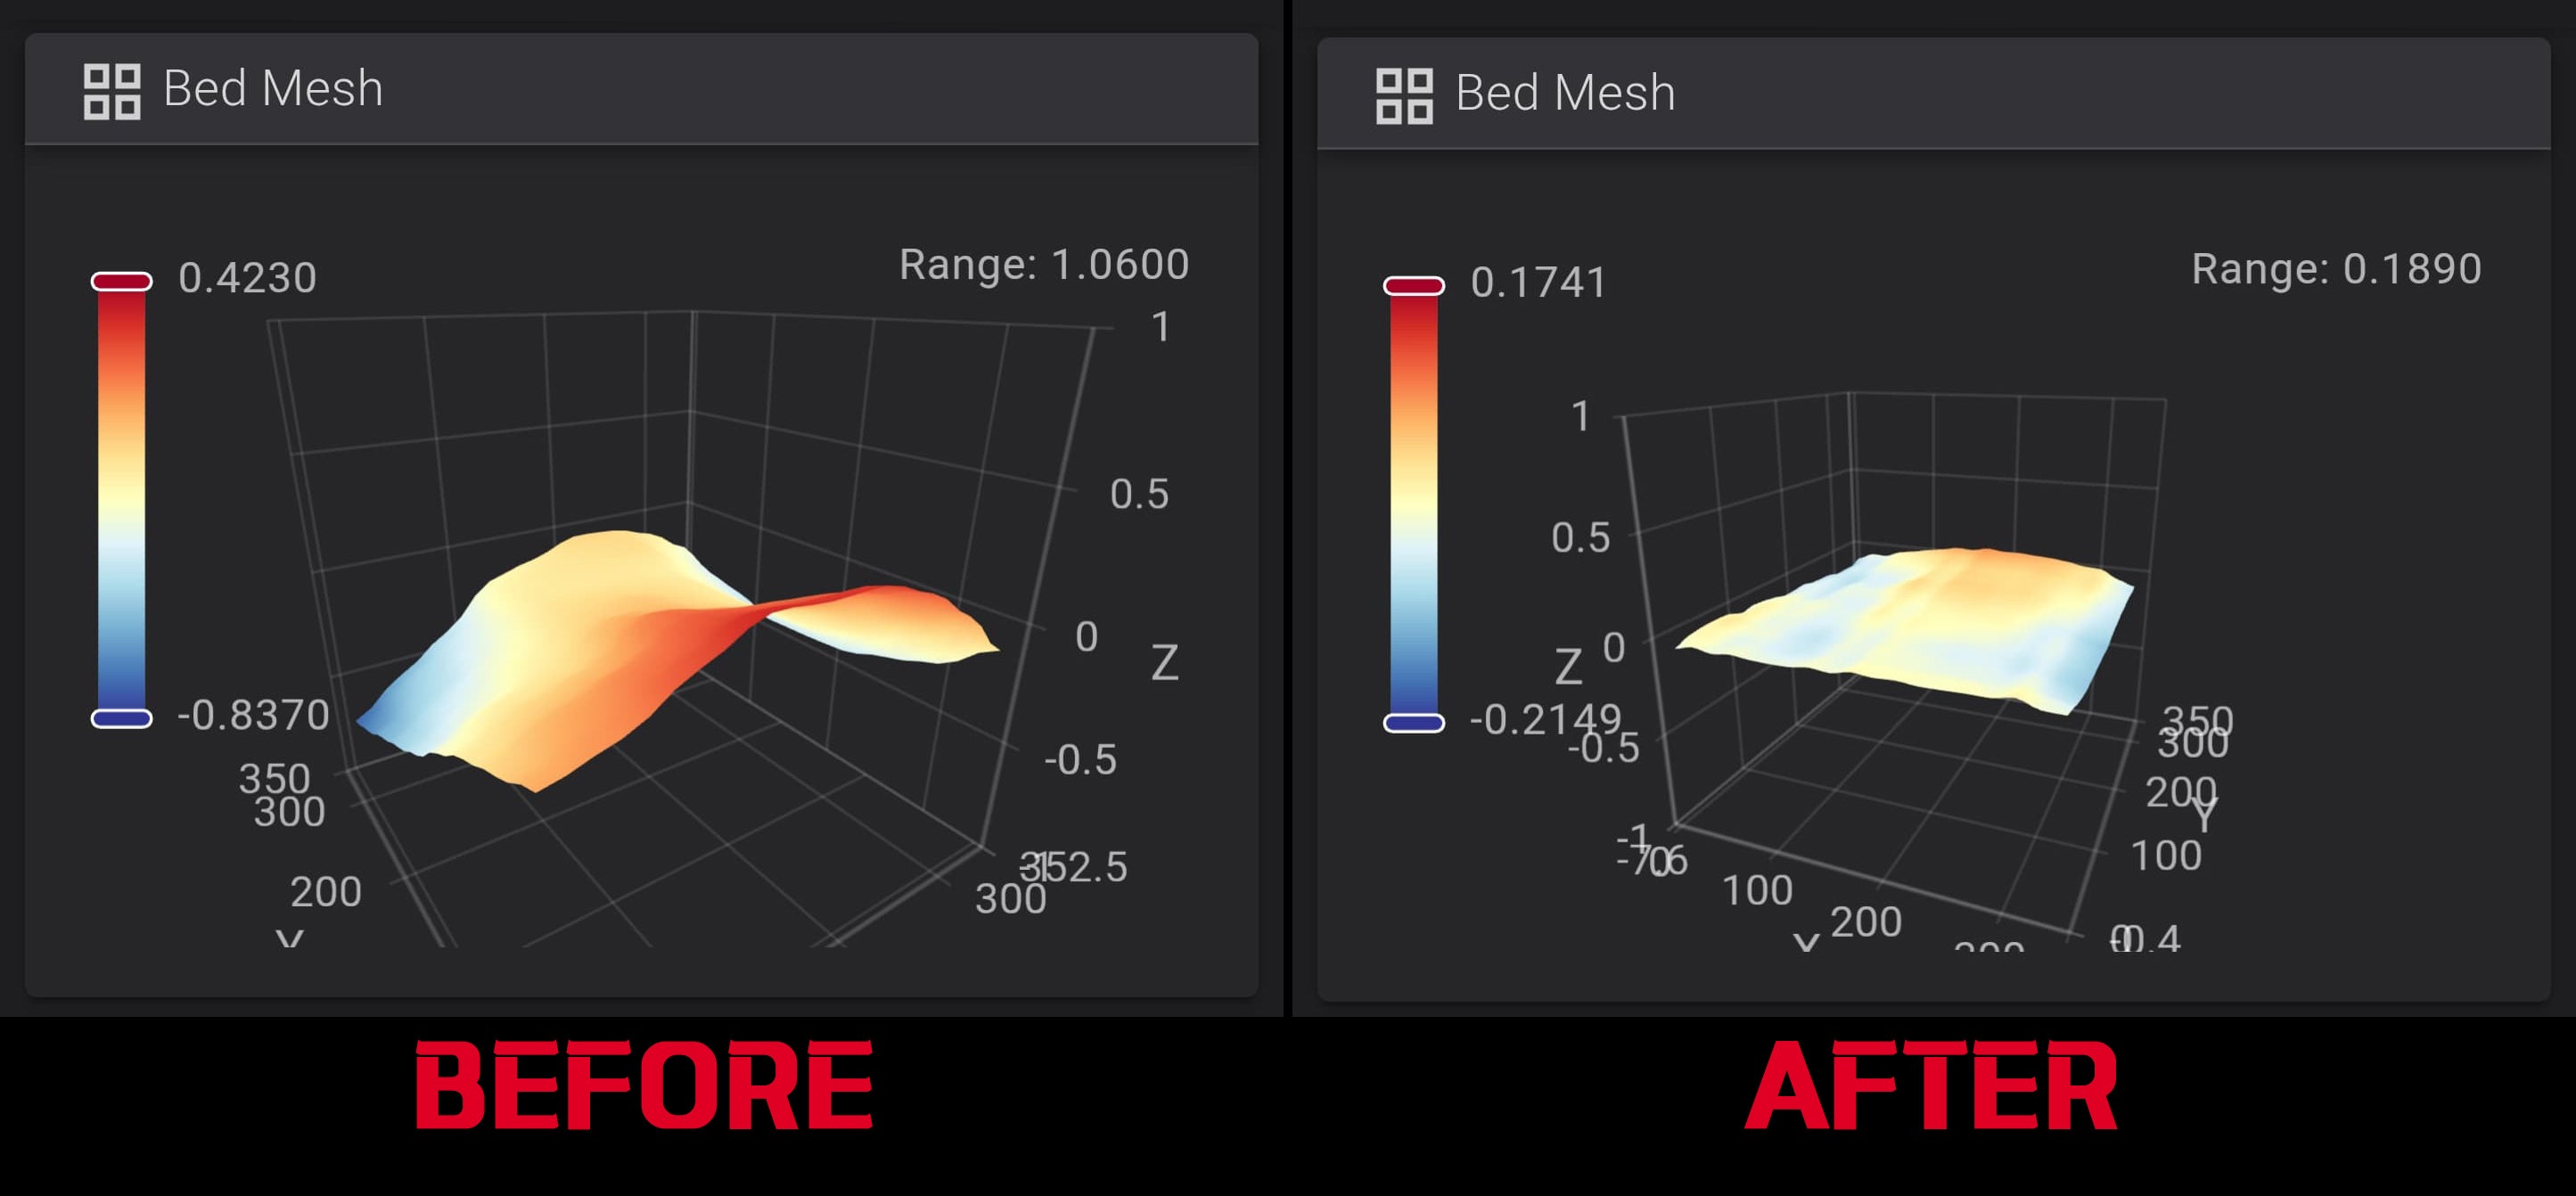
Bed Flatness
The main advantage of this bed is zero warping. You don't need to waste time heat soaking the bed to avoid related print issues.
The bed mesh depends on many things: z assembly, bed plate, bed magnet,
gantry, probe, build plate etc. With all these factors you may have
from 0.1 up to 0.5mm flatness mesh. -

Flat mesh ≠ Perfect first layer
Super flat mesh doesn't mean you get perfect first layer. And the other way around, not perfectly flat mesh doesn't mean you can't have a perfect first layer. We have a printer with 0.07mm range mesh and the first layer is terrible, because of the twisted gantry. To fix your issues with first layer we suggest using Axis Twist Compensation on both X and Y


-

Tested with Cartographer Probe
Every single bed was tested and meshed with Cartographer probe after assembly, which is much more accurate than stock PRTouch. All meshes are 0.1-0.25mm flatness.
But, again, mesh depends on your probe and your gantry!
Some of our testers got 0.25-0.35mm meshes after installation, but the magnet can be sanded to get better results.
-

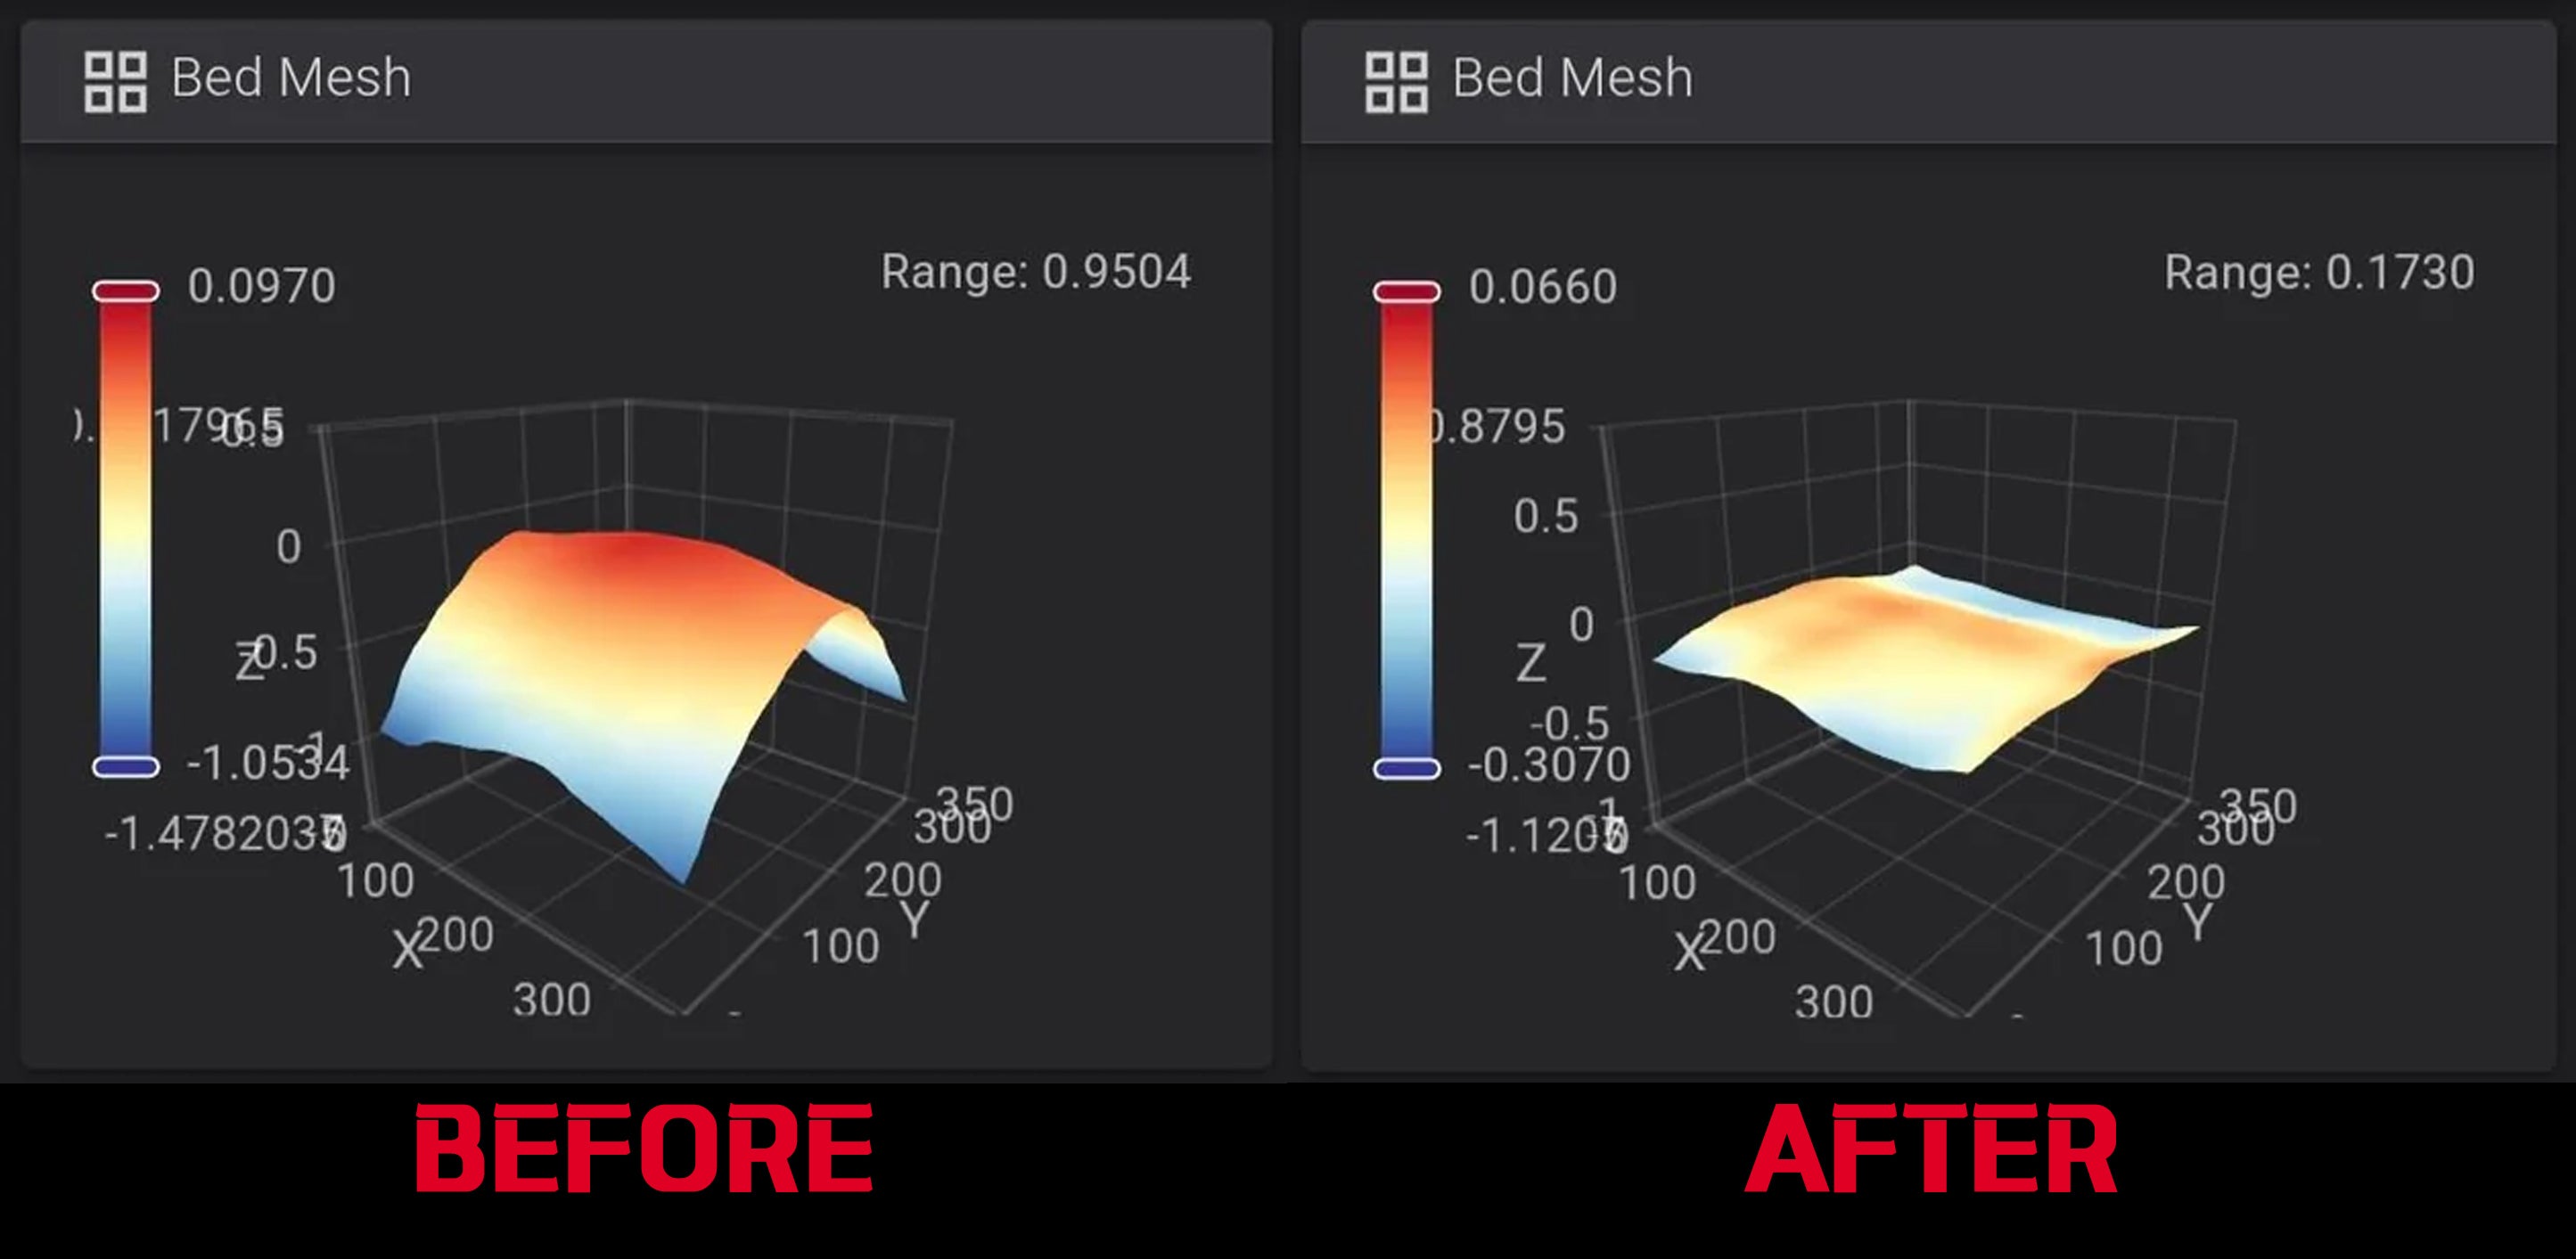
Magnet is the issue
The magnets that are used in 3D printer are imperfect. the thickness of the
magnet with the adhesive layer may vary withing 0.4mm range (+-0.2mm).
Fortunately, these magnets can be sanded. Use this kind of sponge blocks grit
60-80 to sand off any peaks on the mesh. With this trick our buyers could get
their mesh from 0.44mm range down to 0.09mm. -

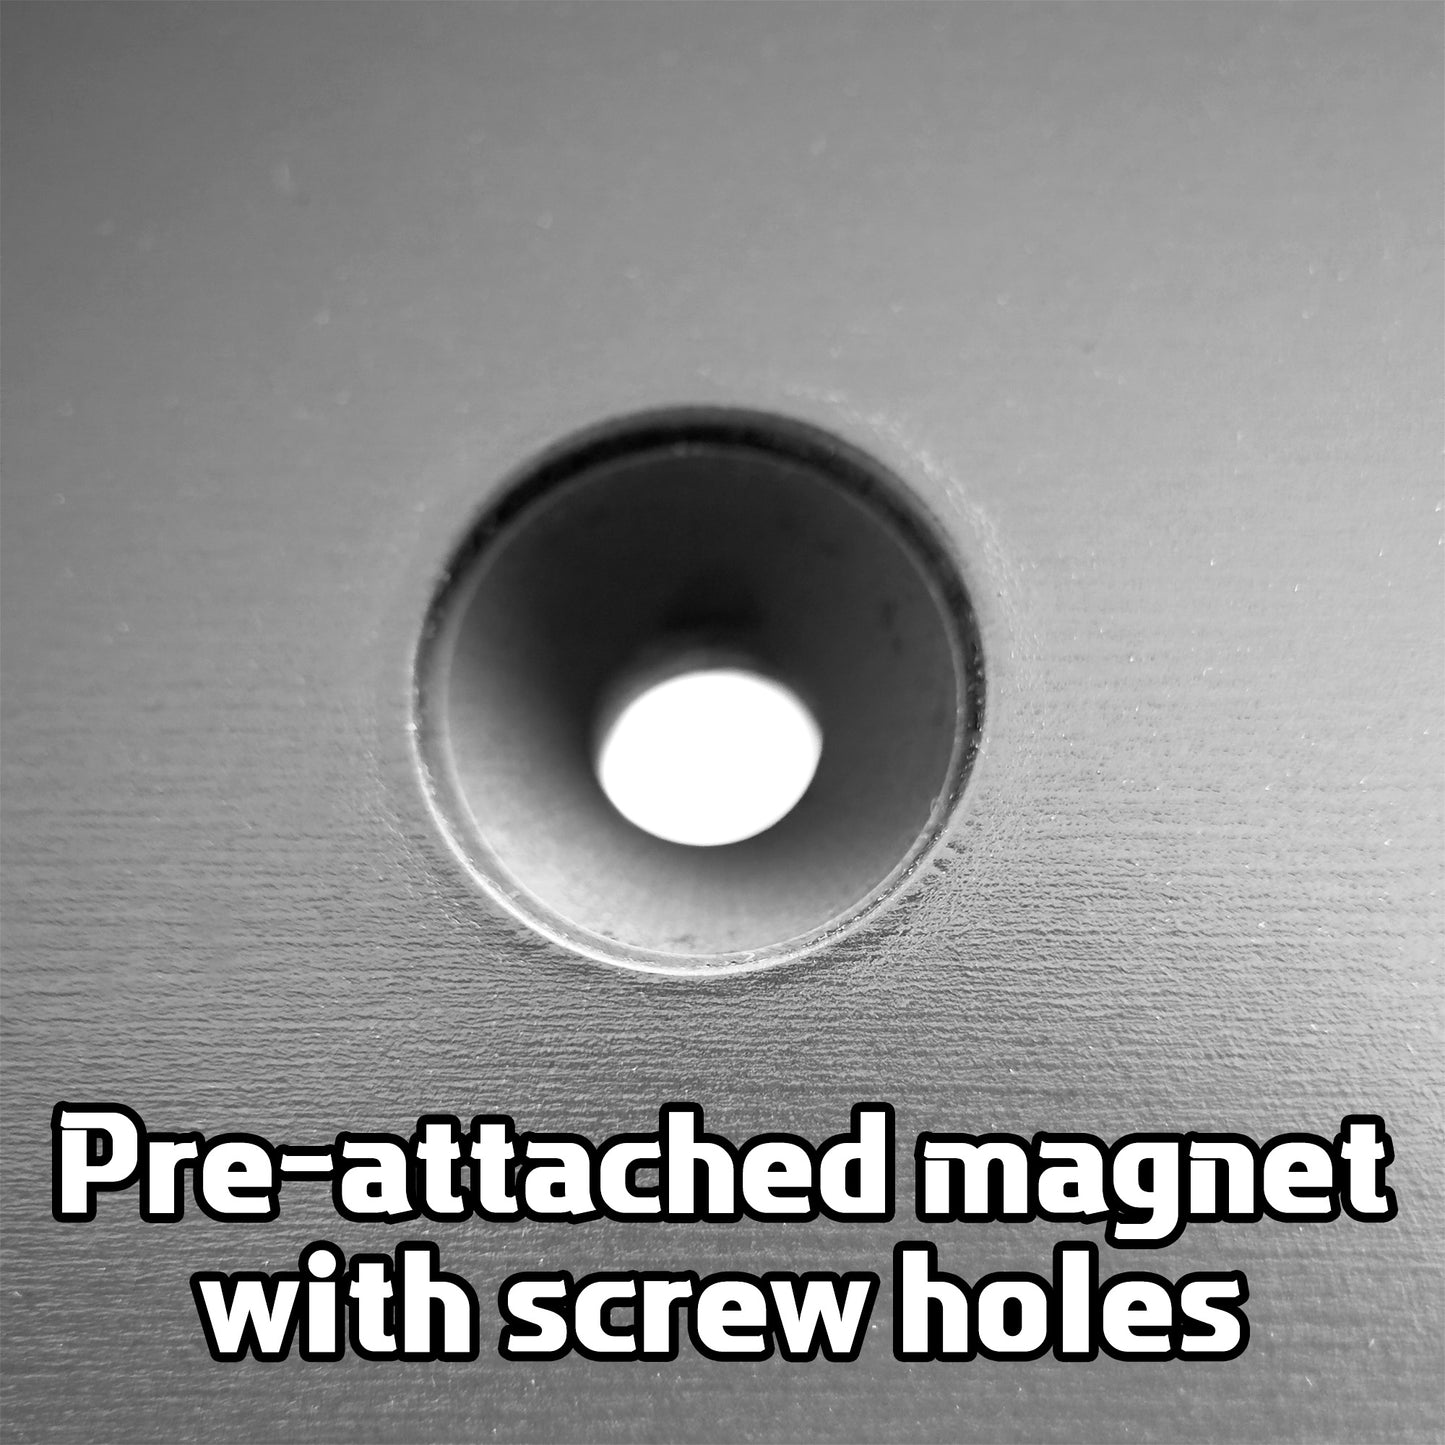
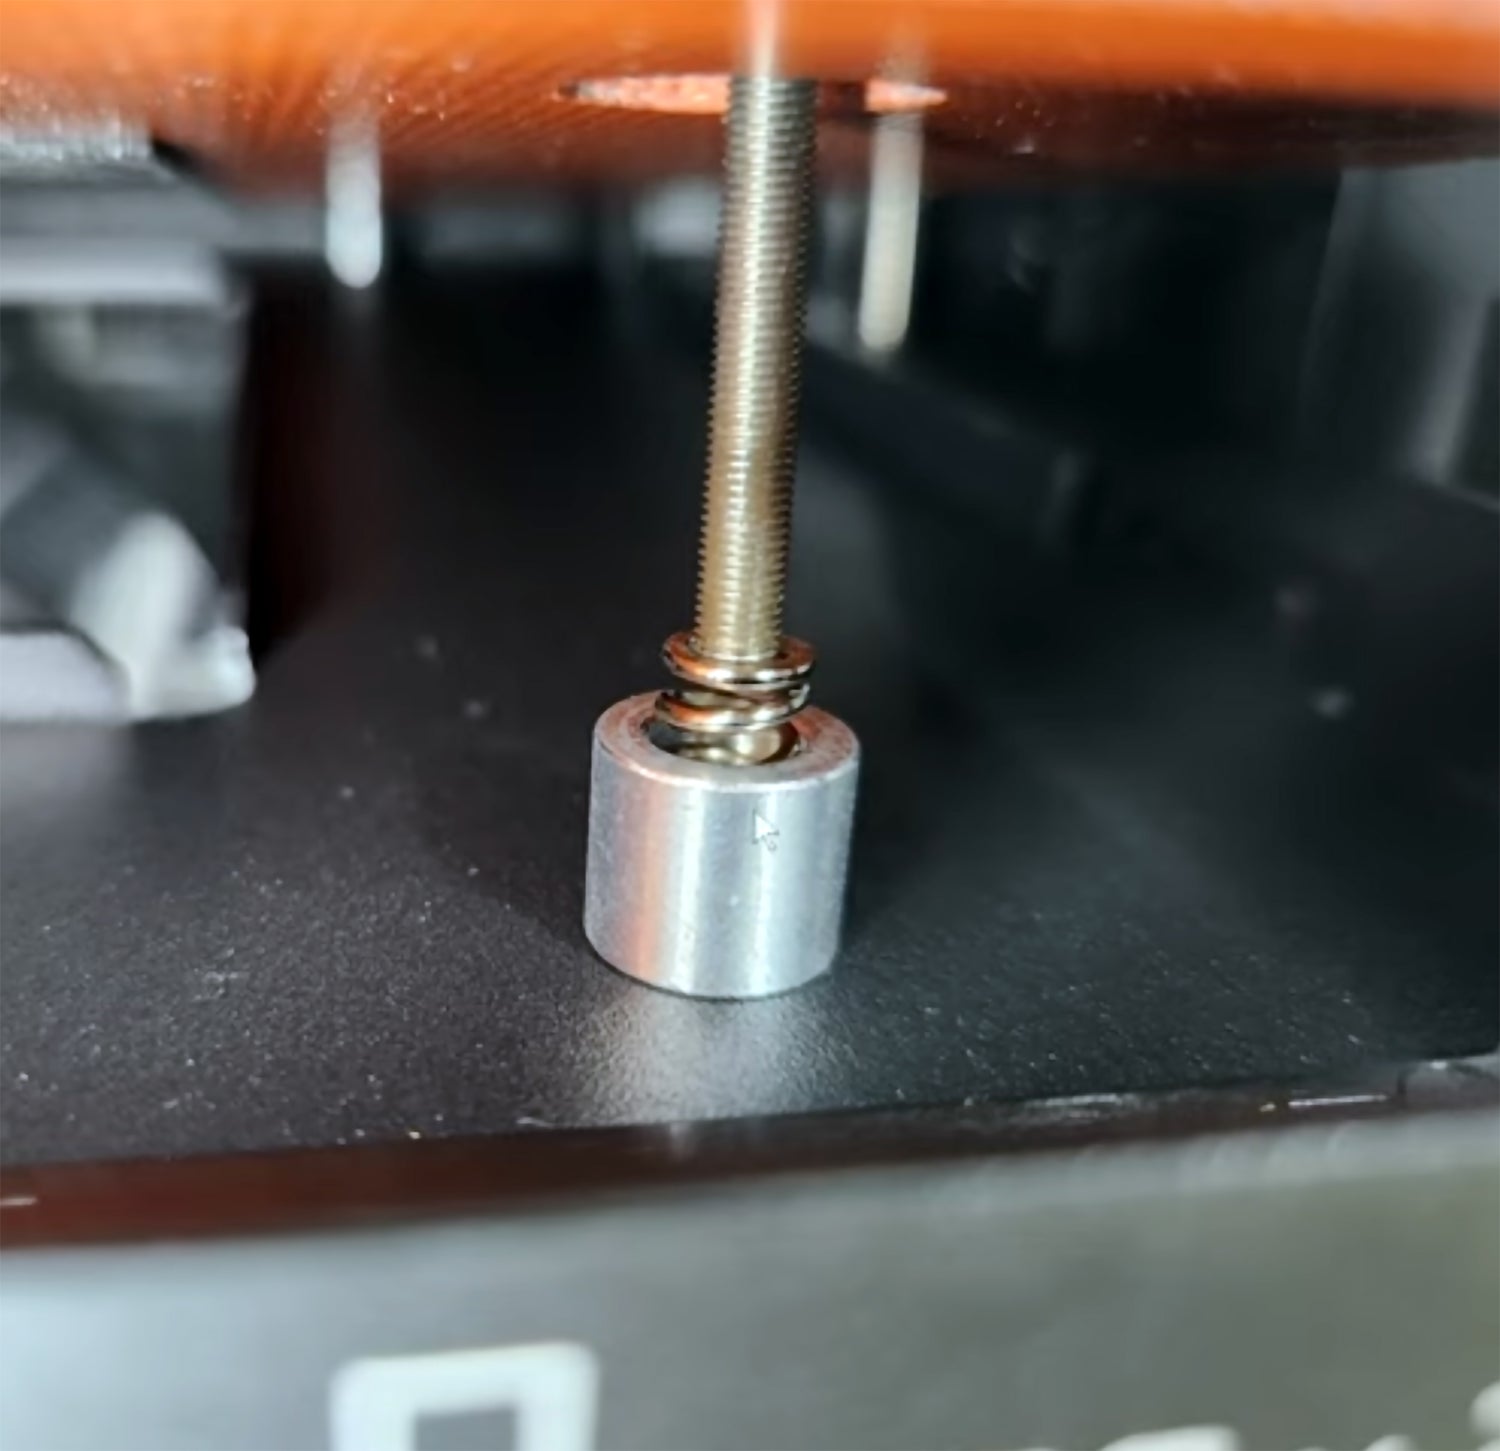
Mount it right
If you use the stock PRTouch bed probe then use the stock metal spacers to mount the bed. For other probes you may use springs with bed knobs which allow you to use the "Screw Tilt Adjust" for easy bed leveling.


Pay attention:
-

Scratched Magnet
If you see this kind of scratches on the magnet, it doesn't mean that it was damaged or used! It means, the magnet had imperfections and after taking a mesh, we helped you sanding it to make it flatter.
-

230v
If your voltage is 230v, then isolate and do not connect the wire for 115v, otherwise it may cause issues with the heater and relay.
-

Build plate alignment
The graphite bed is thicker than the stock bed. For easier build plate alignment, we suggest printing the risers. You can download them on Makerworld CrealityCloud or a remixed version on Printables (easier to print and attach).
Thanks to Stranula and Apok84 for designing them.


Installation Instructions:
Build Plate Alignment Corners
We suggest printing out the build sheet alignment corners prior to installation.
Use high-temp materials such as PA6-CF, PA12-CF, PC, PC-CF, or better
Mounting method
Use the same exact mounting method that is used for the stock bed: stock bolts with knobs + stock metal spacers + stock springs.

230V Connection:
1. Connect 2 white wires to N and 220B slots on SSR. Connect the yellow grounding wire to SSR (grounding wire has a ring terminal).
2. Isolate and DO NOT connect the 110v yellow wire.
3. Connect thermistor to the mainboard.

120V Connection:
1. Connect 110v yellow wire (fork teminal) to N slot, connect 2 white wires together to 110B slot on SSR. Connect the yellow grounding wire to SSR (grounding wire has a ring terminal).
2. Connect thermistor to the mainboard.
Changes in printer.cfg file:
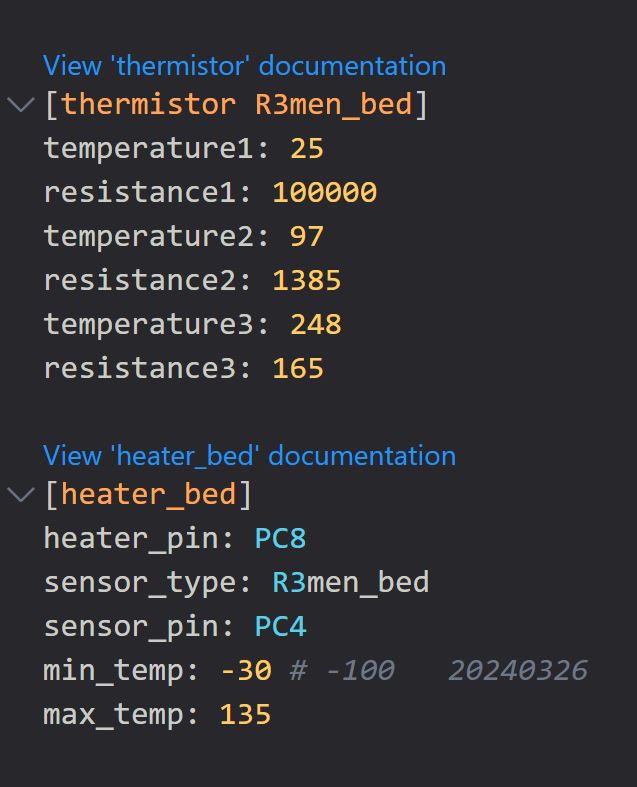
Find [heater_bed] module and add a custom thermistor right above it:
[thermistor R3men_bed]
temperature1: 25
resistance1: 100000
temperature2: 97
resistance2: 1385
temperature3: 248
resistance3: 165
Then change the sensor_type in the [heater_bed] to:
sensor_type: R3men_bed
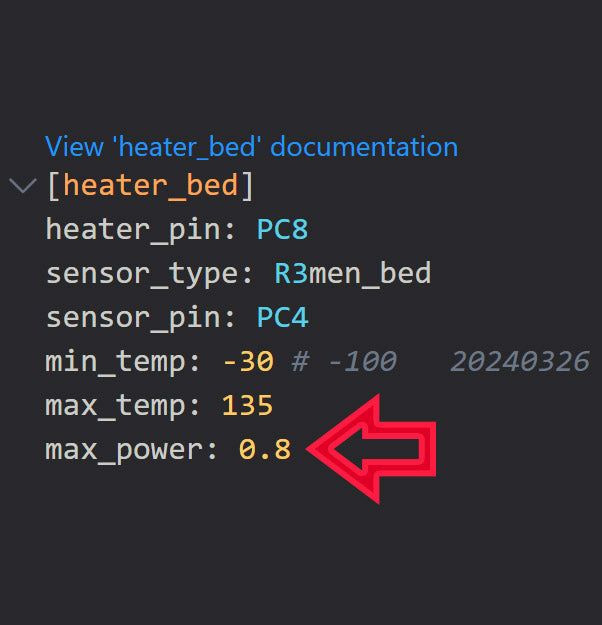
For 110-120v ONLY!
You may want to set the maximum heater power to 0.8 to avoid overloading your UPS and interfering with the operation of other electronic devices.
In the [heater_bed] module add one line:
max_power: 0.8
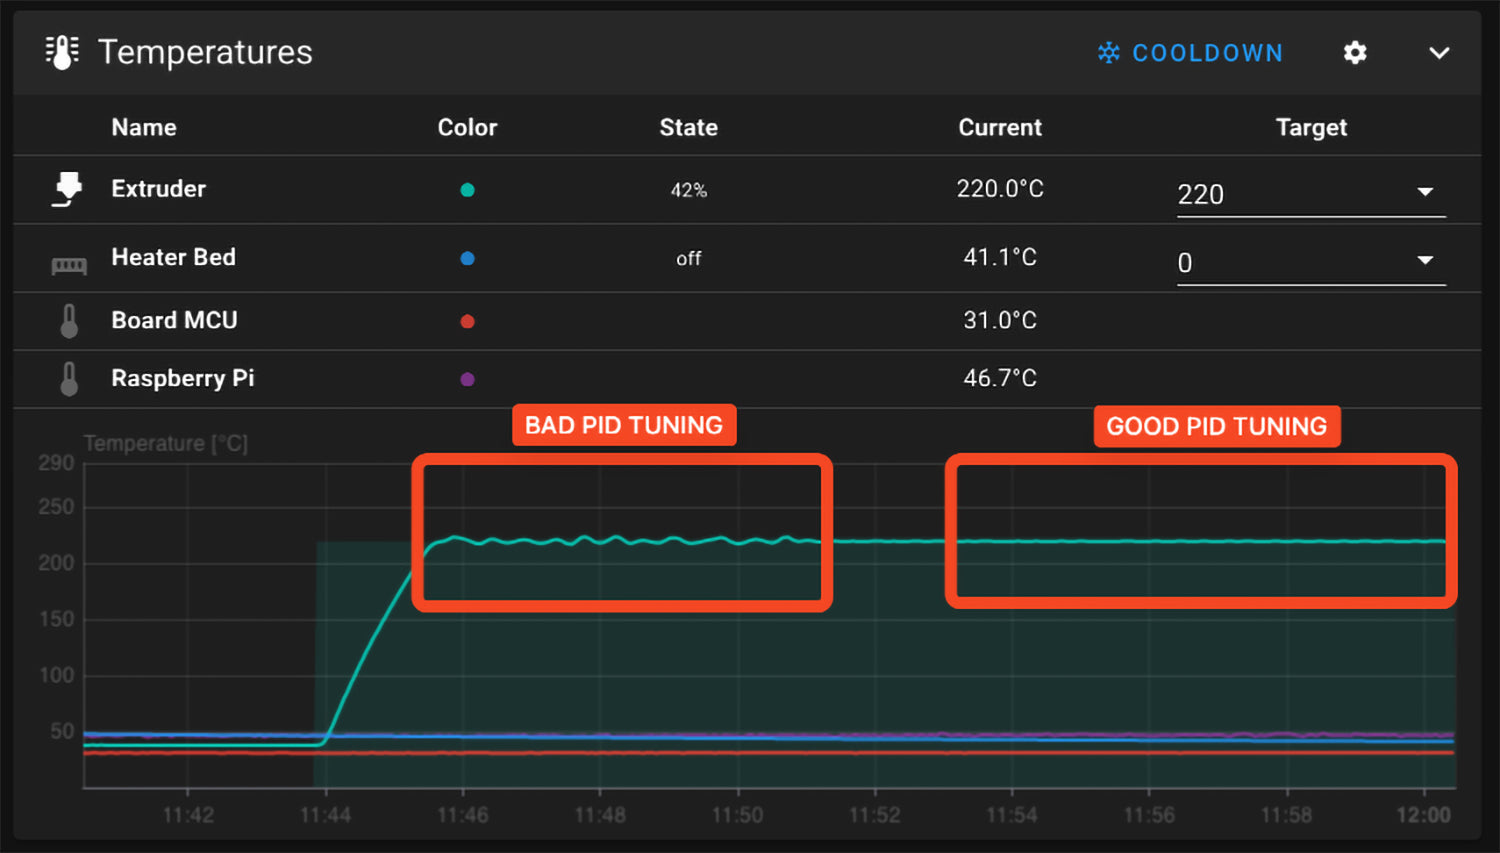
PID Calibration
The heater is more powerful than the stock heater. You need to run PID calibration:
Find and run the macro called "BEDPID" or run in console the command: “PID_CALIBRATE HEATER=heater_bed TARGET=100”, SAVE and restart